
Implementing Working Flow from User App

A dedicated mobile app on both iOS and Android platforms allows customers to get services conveniently from any of the verticals they opt for with the app support. The process to access the services is a user-centric workflow allowing the customer convenience with advanced features and functionalities.
Set Up Profile
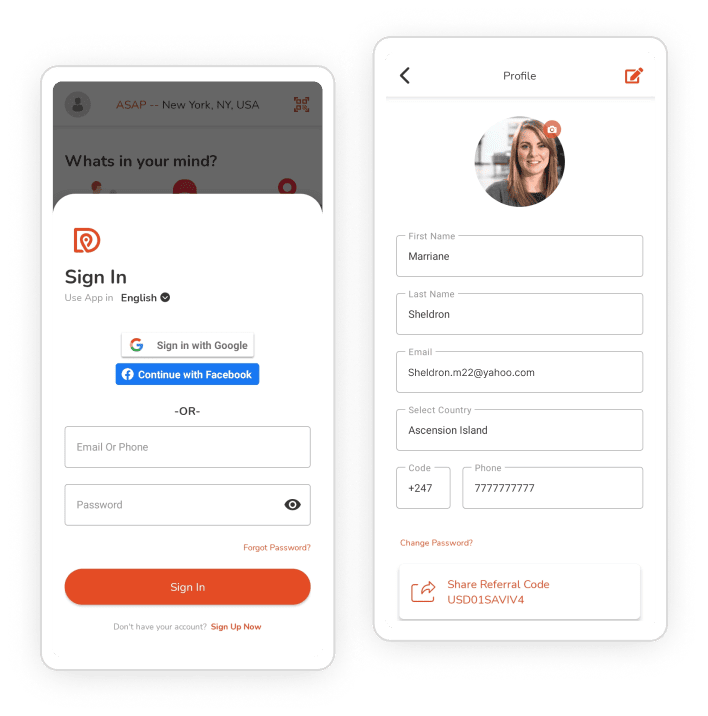
- Users have to register in the profile first, entering all the essential details as asked on the screen.
- They can also choose to signup for the platform using a social media app login, selecting the desired ones.
- Then they have to log in to the platform using the same credentials and start exploring the categories of services.
- Users can also update profile details whenever they want using their login password.

Payments

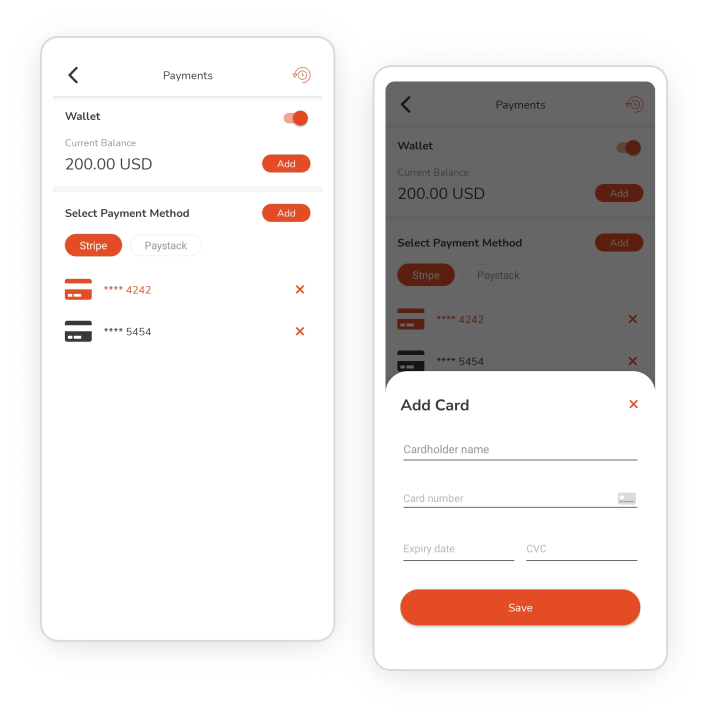
- Customers can set up e-wallets to pay for the services they request through the app.
- First, link a bank account to the app, adding all the necessary details about it. They can add more than one card(credit/debit).
- Then they can add the amount to the wallet from any of the cards linked in the app.
- Moreover, there are two payment gateways – Stripe and Paystack, to choose between, adding their bank details.
General Settings
- Customers have to upload documents to the card if set mandatory by the business admin.
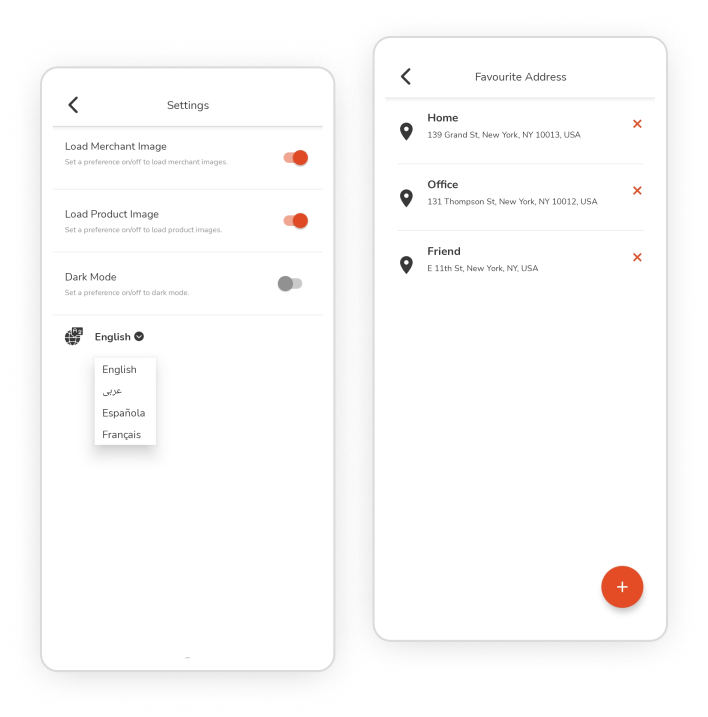
- Settings about the app language preferences, dark mode option and images loading within the app can be done on this screen.
- They can also save multiple addresses for services, such as favorite addresses. Similarly, mark merchants as favorites for instant access.
- Besides, customers get a separate screen for all notifications, the history of all the orders and requests sent through the app, and the app support feature.

A Complete Flow and Graphical Visuals of the All the Verticals of the User App
Here is explained the complete flow of all the verticals incorporated within the ESuper of user app modules, with its inclined graphics.
Enter Trip Details

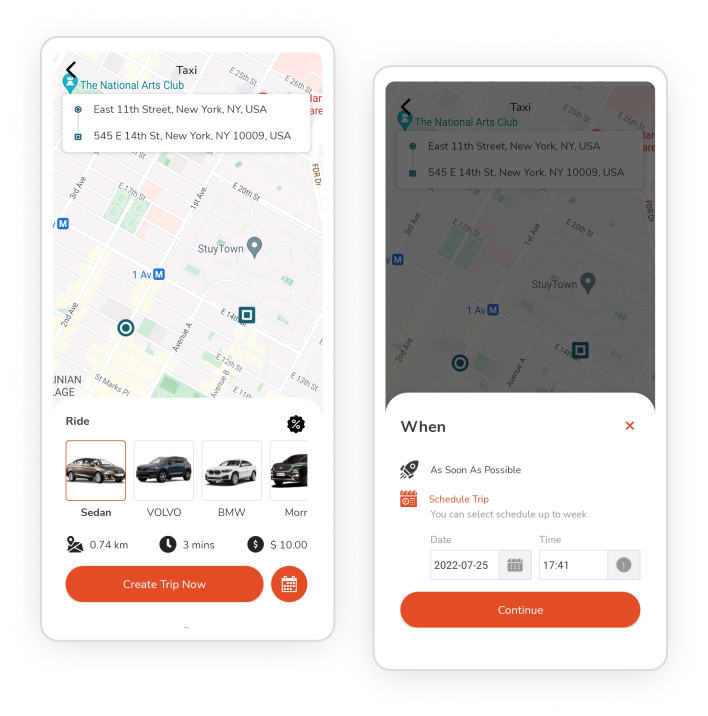
- Select the vertical as “Taxi” in the app. Enter/select through the pickup and destination address within the app.
- Choose the ride type like bike, car, or auto, as offered by the business admin.
- Each of them will have different pricing and sometimes the time to reach the destination. Choose the one verifying both of them.
- Choose whether to get an instant trip or can also schedule it for later by selecting the preferred time and date. Create the Trip.
Payment Screen
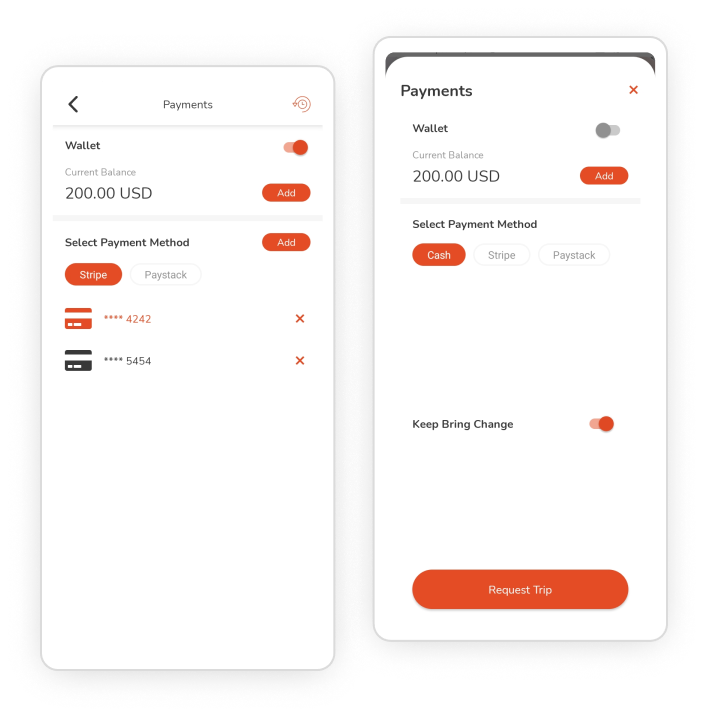
- Users will be moved to the payment screen, where they can select the desired payment method.
- They will have e-wallets, cash payment options, or pay with the cards, in which also they can choose a payment gateway from Stripe and Paystack.
- In cash payment, they can also notify customers to bring change with them to settle the cash amount.
- The trip will be created successfully. Drivers can also be tracked through the app.

Choose a Merchant

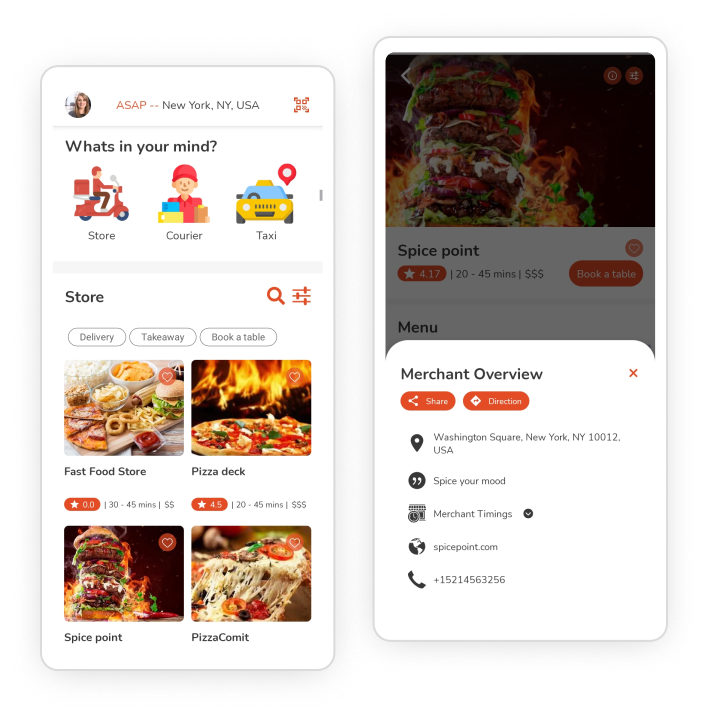
- Customers can select the vertical as “Delivery” and then choose the desired delivery type from the restaurant, grocery, florists, etc., as available in the app.
- After selecting the desired ones, they can browse for desired merchants, verifying their ratings. Also, they can use the filter and search bar to find their preferences easily.
- They can also find the details about the merchant like directions, time, contact number, etc.; they mark it as their favorite and explore the categorized menu.
Add Items
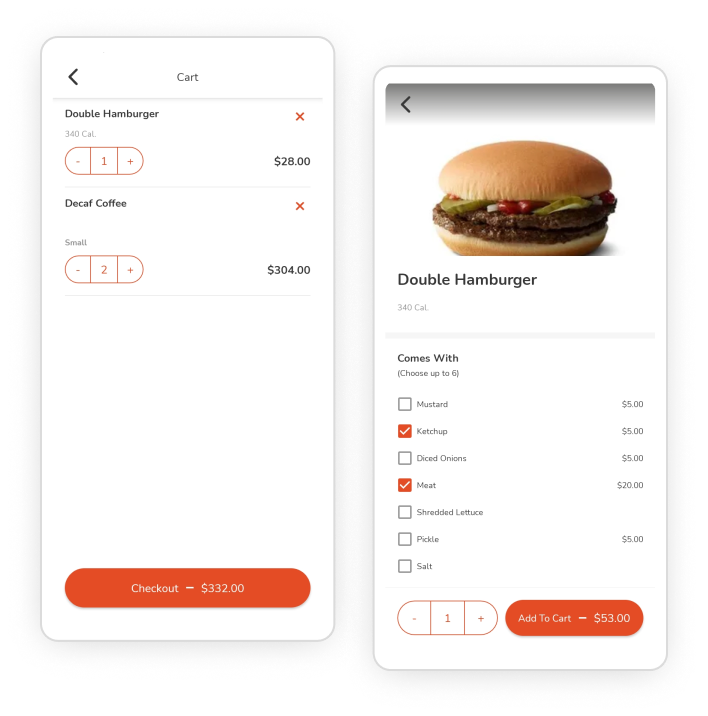
- Users can search for the items or use a filter to get the customized menu.
- They can browse the merchant’s menu to get their desired items adding them to the cart, which also they can customize if allowed by the store owners.
- All the items would be added to the cart, where they can also again add or delete items.
- Further can move to the checkout screen after finalizing the order.

Checkout Screen

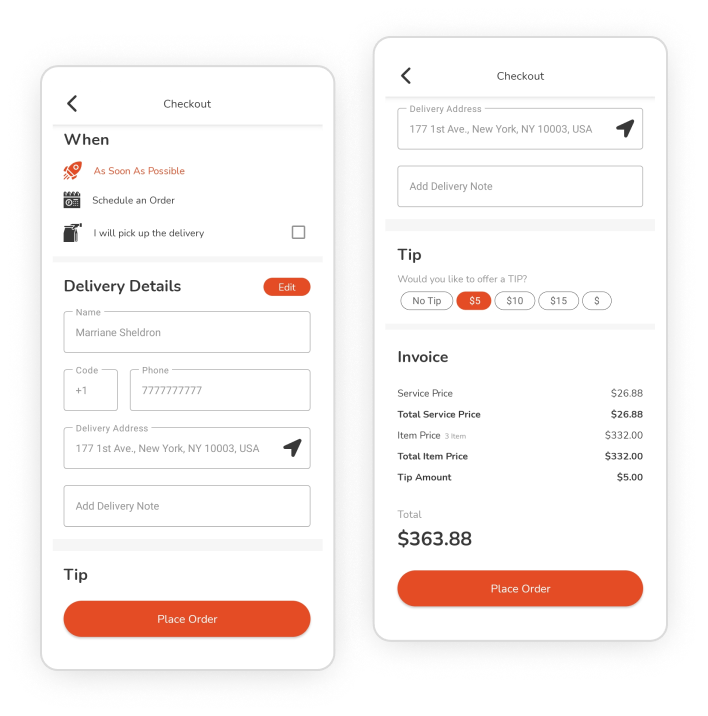
- On the checkout screen, they can choose to get instant orders or can also schedule them for later, entering the preferred time and date. If allowed by the merchants, they can choose “Takeaway service.”
- Next, they can edit the delivery details and add a delivery note, and if they have any, enter the promo coupon code and choose to tip the deliveryman.
- Further, they can review the invoice details, which comprise the delivery charge, item pricing, tax if applied any, and a total for all.
- Finally, they can place the order, confirming the delivery price.
Payment Screen
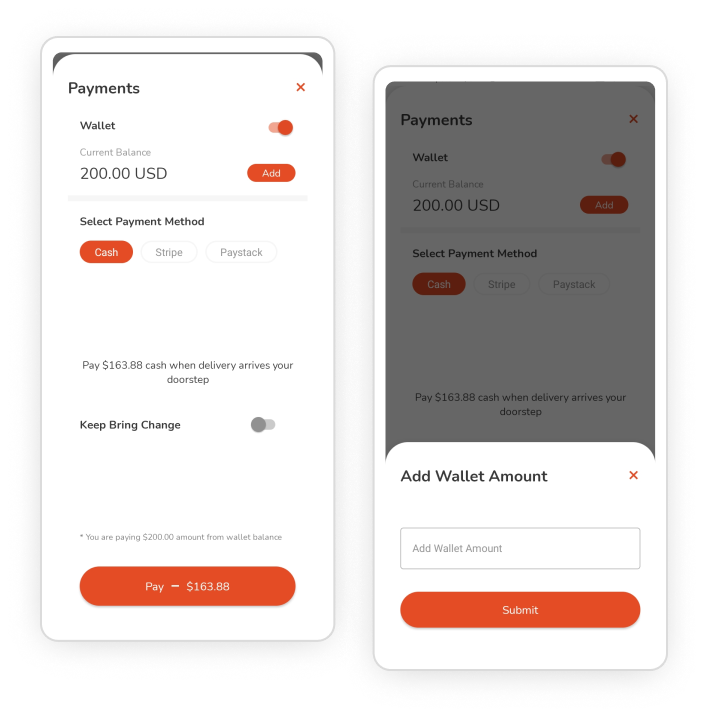
- Customers can select the desired payment method from cash, card, and e-wallets.
- In cash payment, they can also notify the deliveryman to bring change with them to settle the cash amount.
- They will have an e-wallet amount already set up, and if not can add it at the moment and then pay for the order through it.
- For card payment also, users can add new cards if required to do so and then pay through it. Or choose from the already existing ones. Choose the desired payment gateway for card payment from Stripe and Paystack.

Track Order

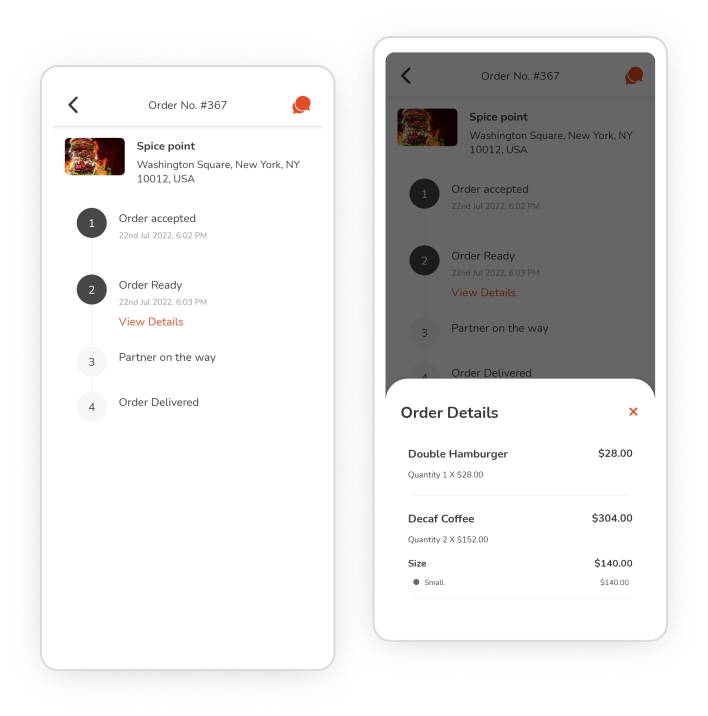
- Customers can choose to track their orders for the entire process. Starting from placing the orders. Next, when the store accepts the order. And until the order is delivered.
- For all status, they will be notified. Also, they can cancel the order if merchants allow doing so, which could charge them an amount as per the store’s policies.
- For any queries about the order, they can chat with the merchants. They can also chat with the deliveryman for delivery-related questions.
- At last, they can give ratings and reviews to the stores and deliverymen based on their experience through the entire process.
Choose a Service Provider

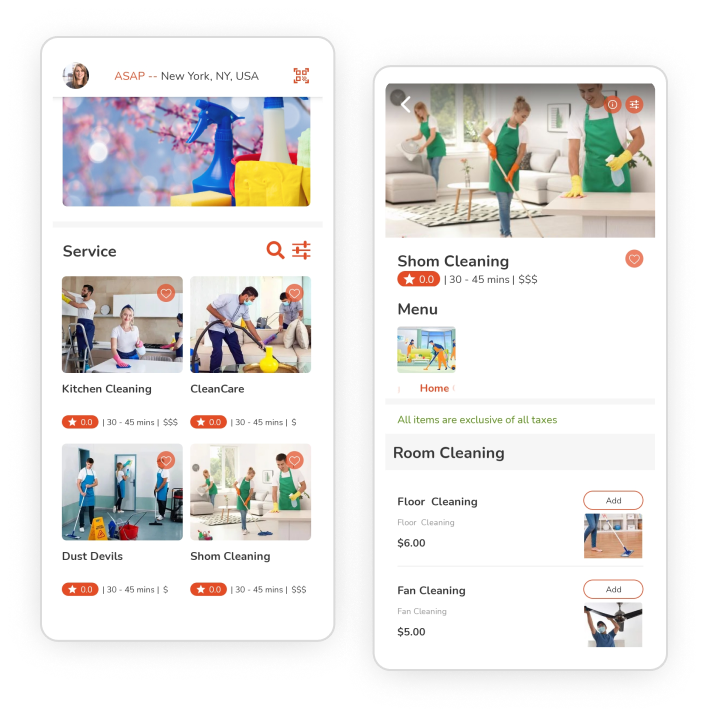
- Customers can select the vertical as “Service” and then choose the desired service type from the mentioned categories like Plumbing, Electrician, Cleaning, Carpenter, etc., as available in the app.
- After selecting the desired ones, they can browse for desired service providers, verifying their ratings, timings, and charge range. Also, they can use the filter and search bar to find their preferences easily.
- They can also find the provider’s details, like directions, time, contact number, etc.; they mark it as their favorite and explore the categorized services offered.
Add Services in Cart
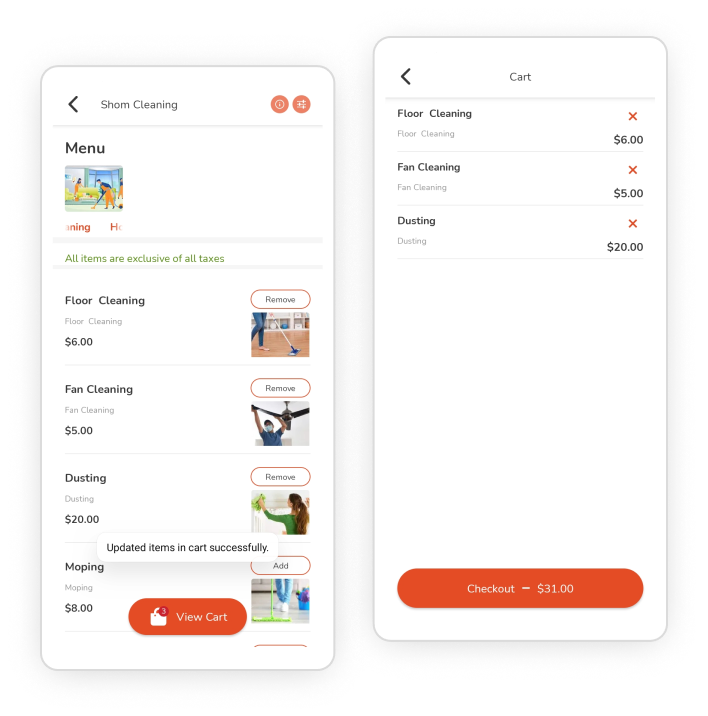
- Users can search for the services or use search filters to get the customized menu.
- They can browse them to get their desired services and add them to the cart, which also they can customize if allowed by the store owners.
- All the services would be saved to the cart, where they can also again be added or deleted. For each service, they can add a note if customers have anything about it.
- Further can move to the checkout screen after finalizing the service(s).

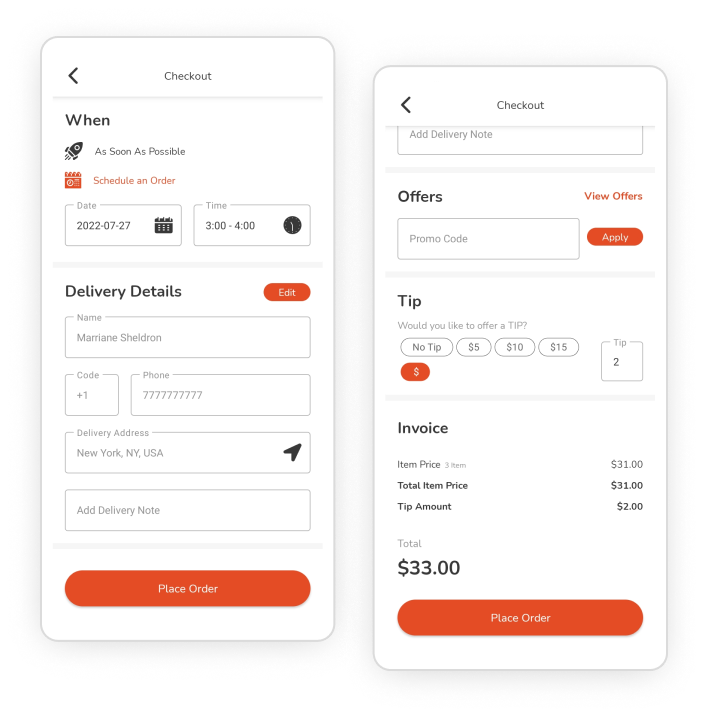
Checkout Screen

- On the checkout screen, they can choose to get instant services or can also pre-plan them for later, entering the desired time and date.
- Next, they can edit the service-related details and add a note, and if they have any preferences for the services, enter the promo coupon code and choose to tip the providers.
- Further, they can review the invoice details, which comprise the service charge, tax if applied any, and a total for all.
- Finally, they can place the service request, confirming the price, services, and all other inclined details.
Payment Screen
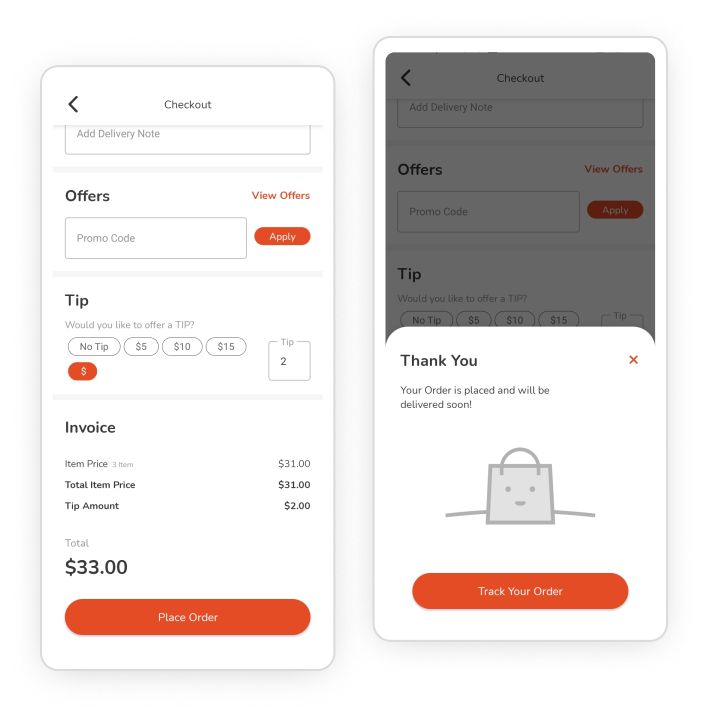
- They will be moved to the payment screen and can select the desired payment method from cash, card, and e-wallets.
- In cash payment, they can also notify service partners to bring change with them to settle the cash amount.
- They will have an e-wallet amount already set up, and if not can add it at the moment and then pay for the order through it.
- For card payment also, users can add new cards if required to do so and then pay through it. Or choose from the already existing ones.
- Choose the desired payment gateway for card payment from Stripe and Paystack.

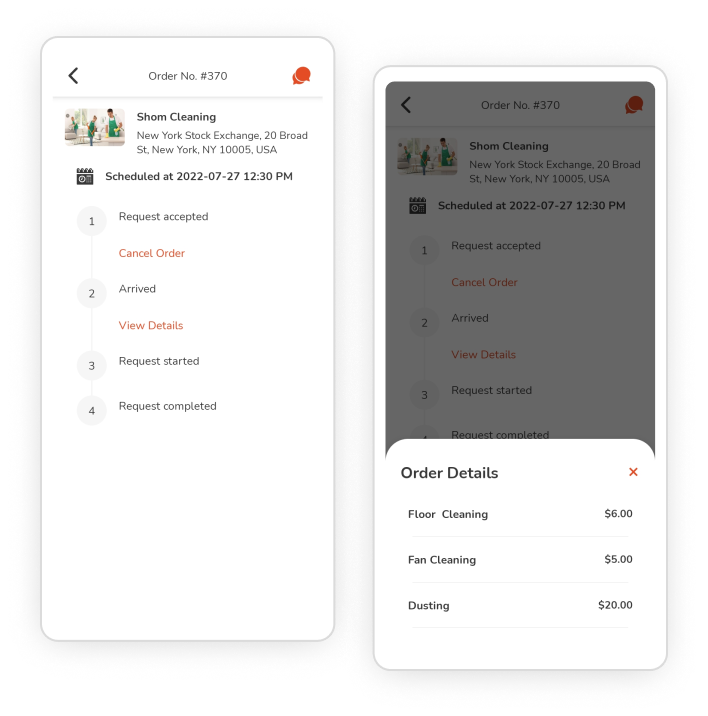
Track Service Status

- Customers can choose to track their orders for the entire process. Starting from placing the orders. Next, when the merchants accept the request. And until the service is completed.
- For all status, they will be notified on the mobile and also within the app on the notification screen. Also, they can cancel the order if customers allow doing so, which could charge them an amount as per the store’s policies.
- For any queries about the order, they can chat with the service providers. They can also chat with the service partners for service-related questions.
- At last, they can give ratings and reviews to the service providers and partners based on their experience through the entire process.
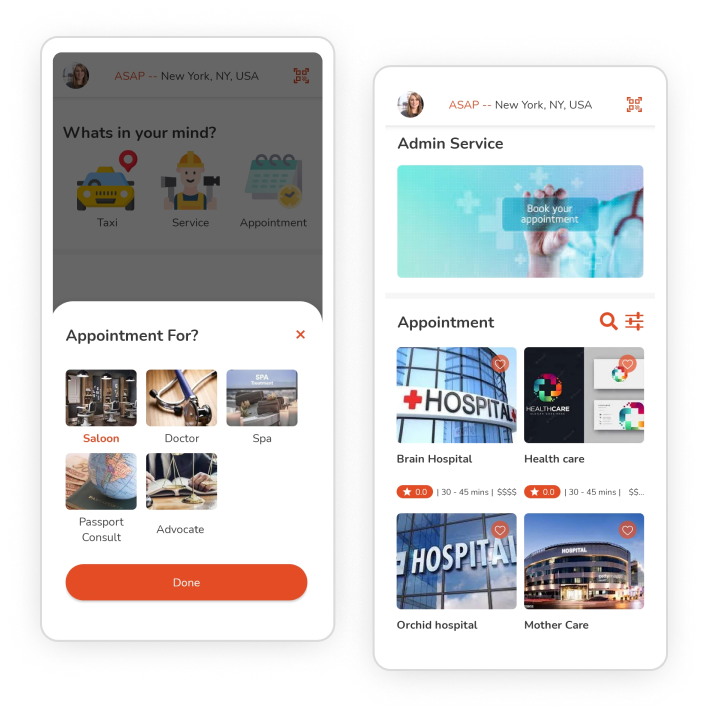
Choose a Service for Appointment

- Customers can select the vertical as “Appointments” and then choose the desired service type from the mentioned categories like Beautician, Advocate, Saloon, Doctor, Tutorial, etc., as available in the app.
- Further, they have to select the desired type of appointments inside it; they can browse for desired providers, verifying their ratings, timings, and charge range. Also, they can use the filter and search bar to find their preferences easily.
- They can also find the provider’s details, like directions, time, contact number, etc.; they mark it as their favorite and explore the categorized services offered.
Add Services in Cart
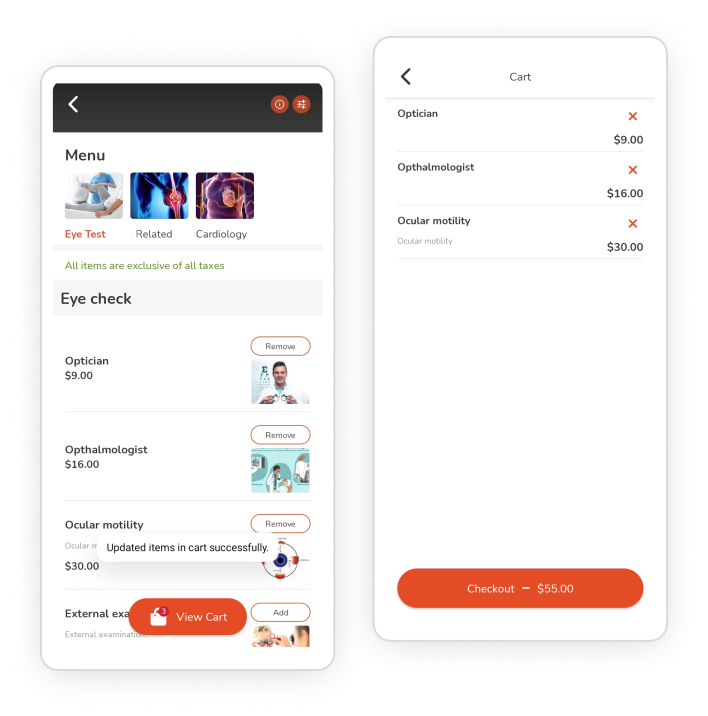
- Users can search for the appointments or use search filters to get a customized list of services.
- They can browse them to get their desired services and add them to the cart, which also they can customize if allowed by the providers.
- All the services would be saved to the cart, where they can also again be added or deleted. For each appointment, they can add a note if customers have anything about it.
- Further can move to the checkout screen after finalizing the service(s).

Checkout Screen

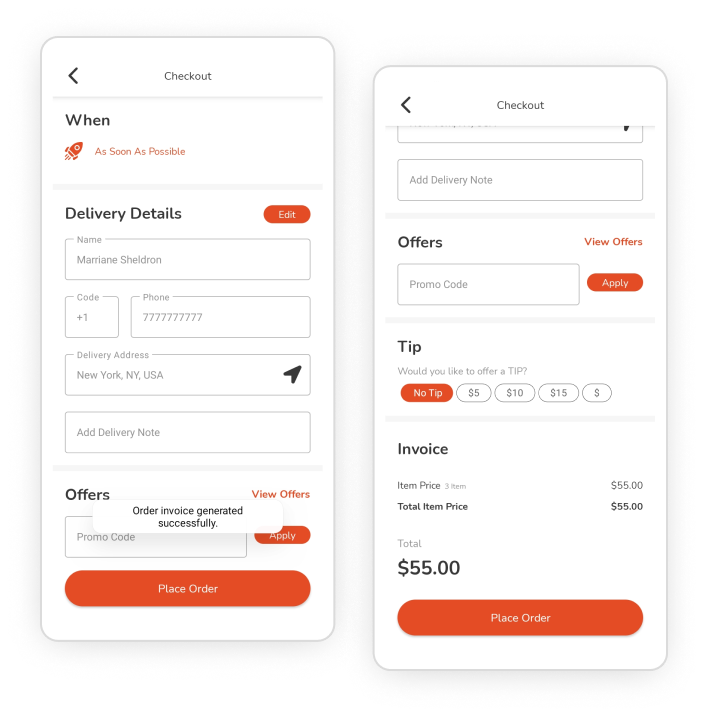
- On the checkout screen, they can choose to get instant services or can also pre-plan them for later, entering the desired time and date.
- Next, they can edit the service-related details and add a note, and if they have any preferences for the services, enter the promo coupon code and choose to tip the providers.
- Further, they can review the invoice details, which comprise the service charge, tax if applied any, and a total for all.
- Finally, they can place the service request, confirming the price, services, and all other inclined details.
Payment Screen
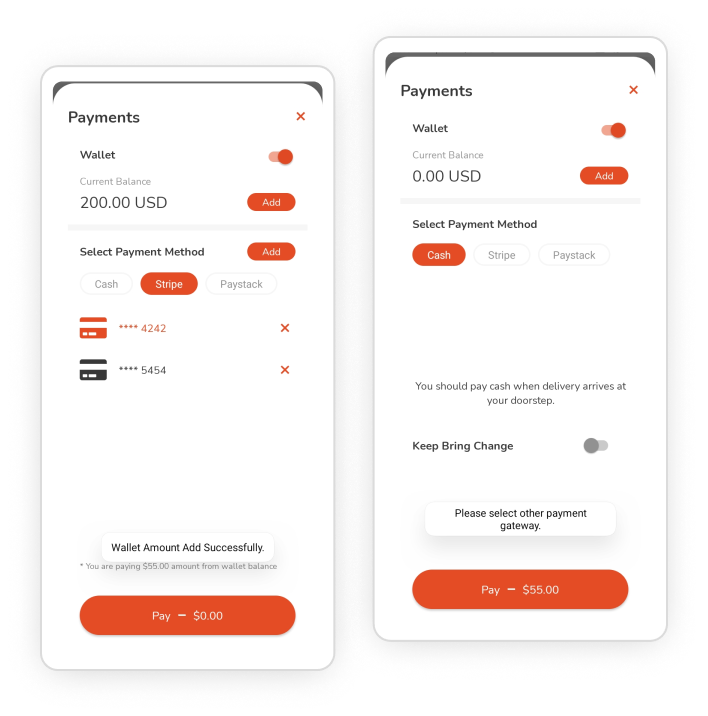
- They will be moved to the payment screen and can select the desired payment method from cash, card, and e-wallets.
- In cash payment, they can also notify service partners to bring change with them to settle the cash amount.
- They will have an e-wallet amount already set up, and if not can add it at the moment and then pay for the order through it.
- For card payment also, users can add new cards if required to do so and then pay through it. Or choose from the already existing ones. Choose the desired payment gateway for card payment from Stripe and Paystack.

Track Order

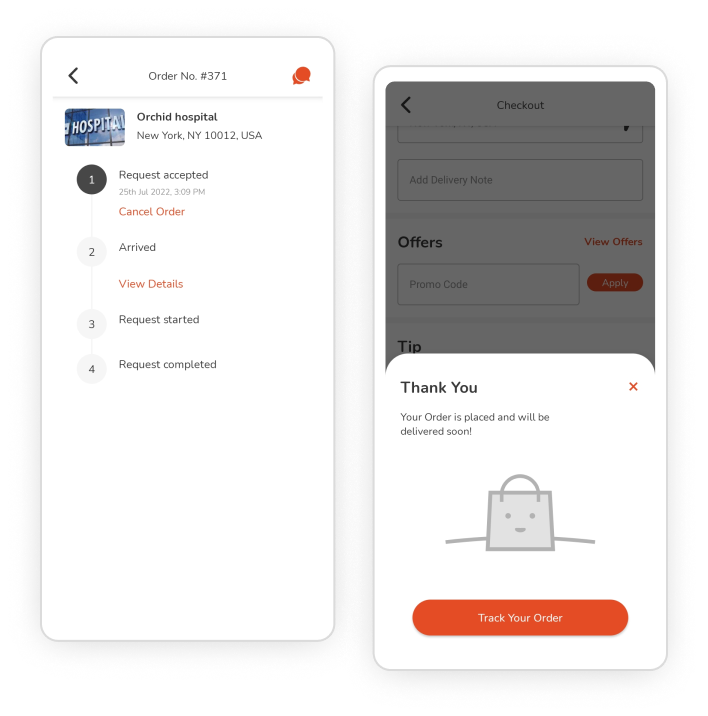
- Customers can choose to track their orders for the entire process. Starting from placing the orders. Next, when the merchants accept the request. And until the service is completed.
- For all status, they will be notified on the mobile and also within the app on the notification screen. Also, they can cancel the order if customers allow doing so, which could charge them an amount as per the store’s policies.
- For any queries about the order, they can chat with the service providers. They can also chat with the service partners for service-related questions.
- At last, they can give ratings and reviews to the service providers and partners based on their experience through the entire process.
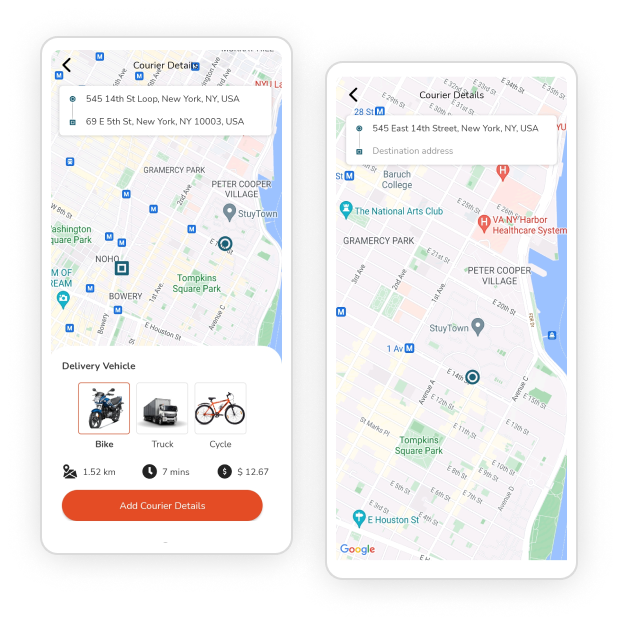
Enter Address

- Customers have to enter the address for pick up and delivery address for the courier.
- Choose the vehicle type for courier delivery, depending on the weight and number of parcels.
- The price could be verified as the delivery vehicle is changed. Also, check the distance and time for delivery.
- Decide to get instant delivery service for the parcel or can also choose to schedule it for later.
Add Courier Details
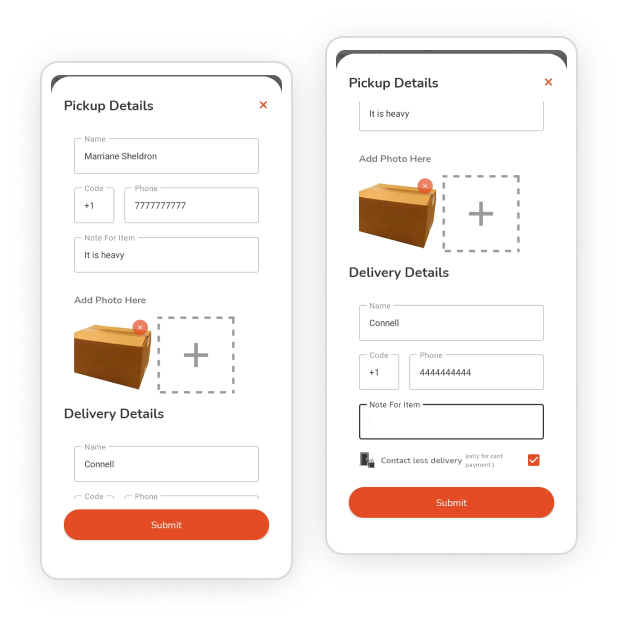
- Enter the courier details like pickup details and the person from whom the parcel is picked up. Details like name, contact number, and delivery notes.
- They can also add an image of the parcel that has to be delivered, which is optional for customers. Similarly, details of the person who will receive the parcel have up to be added.
- Customers can choose contactless delivery, which is also only available for card payments.
- Request the courier service then, and then will get an invoice of the final service for verification which they can review. Finally, place the order.

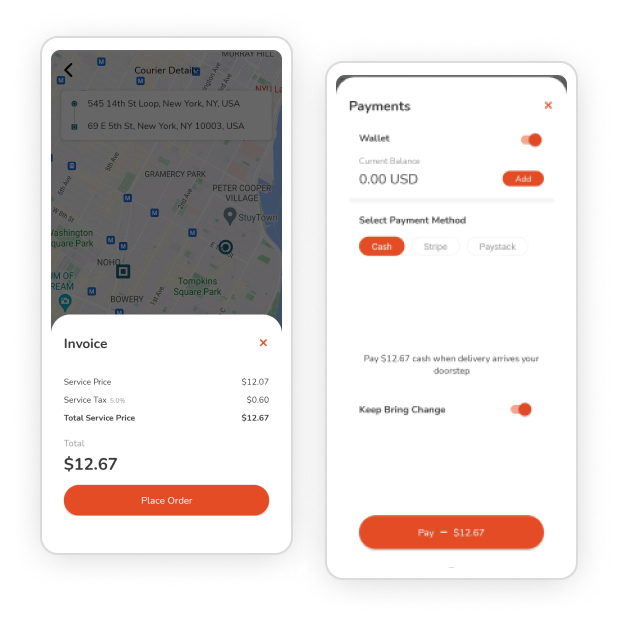
Payment Screen

- Customers can select the desired payment method from cash, card, and e-wallets.
- In cash payment, they can also notify the deliveryman to bring change with them to settle the cash amount.
- They will have an e-wallet amount already set up, and if not can add it at the moment and then pay for the courier service through it.
- For card payment also, users can add new cards if required to do so and then pay through it. Or choose from the already existing ones. Choose the desired payment gateway for card payment from Stripe and Paystack.
Track Order
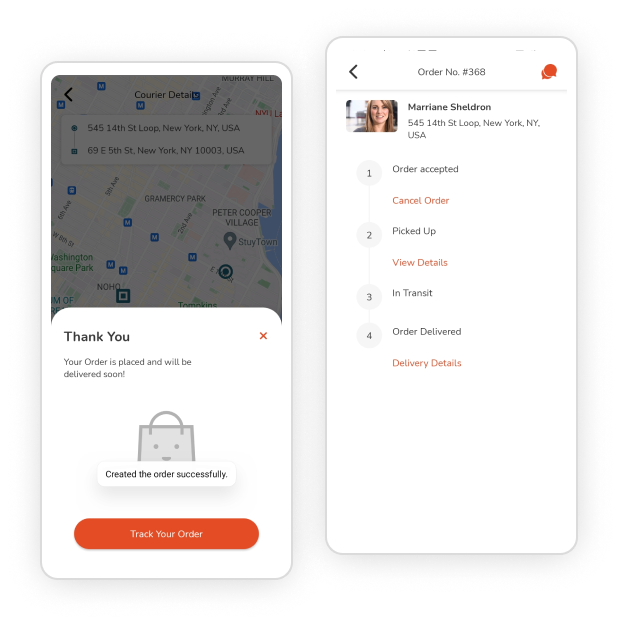
- Customers can choose to track their courier orders for the entire process. Starting from placing the request. Next, when the merchants accept the order. And until the order is delivered.
- For all status, they will be notified. Also, they can cancel the order if merchants allow doing so, which could charge them an amount as per the store’s policies.
- For any queries about the order, they can chat with the merchants. They can also chat with the deliveryman for delivery-related questions.
- At last, they can give ratings and reviews to the merchants and deliverymen based on their experience throughout the entire process. Customers can also cancel requests by giving an appropriate reason.

